This is for you if you want to have an edge. This tool makes Grid and Martin Gale trading possible manually.
This Expert Advisor gives traders a powerful weapon if used properly, making it harder to lose money in the markets. The idea behind it is that it's easier to predict whether big price movements or market stagnation will occur, rather than predicting whether the price will go up or down. This tool allows users to take advantage of news events or calm and consistent markets, using strategies that are forbidden in casinos. I've created an easy-to-use graphical user interface that allows users to create powerful strategies.
You can contact me after installation to join the group chat.
MT4 Version: https://www.mql5.com/en/market/product/96629
The EA was renamed, it used to have the name AdvantEdge.
With this Expert Advisor, you can:
- Implement your own Zone Recovery strategy to capitalize on trending markets.
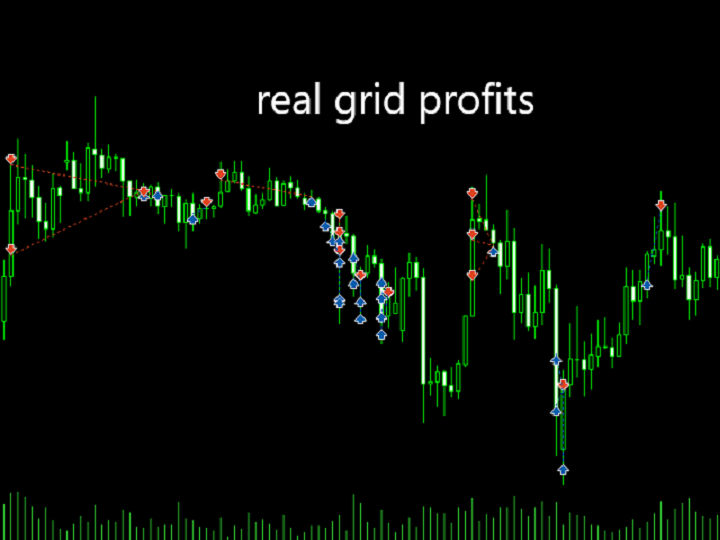
- Create Grid trading strategies, to profit from ranging markets.
- Easily calculate how to recover from a loss.
- Place orders easily and clearly.
- Display your trades/strategies on the chart.
- Display your Take Profits/Stop Losses as a percentage.
- Display volume in monetary amount.
This tool has helped me solve many of my own problems, and now I'm trying to help others as well. It can function as both a trade manager and a trading bot at the same time.
How it works?
There are three modes:
- Trade
- Zone Recovery
- Grid
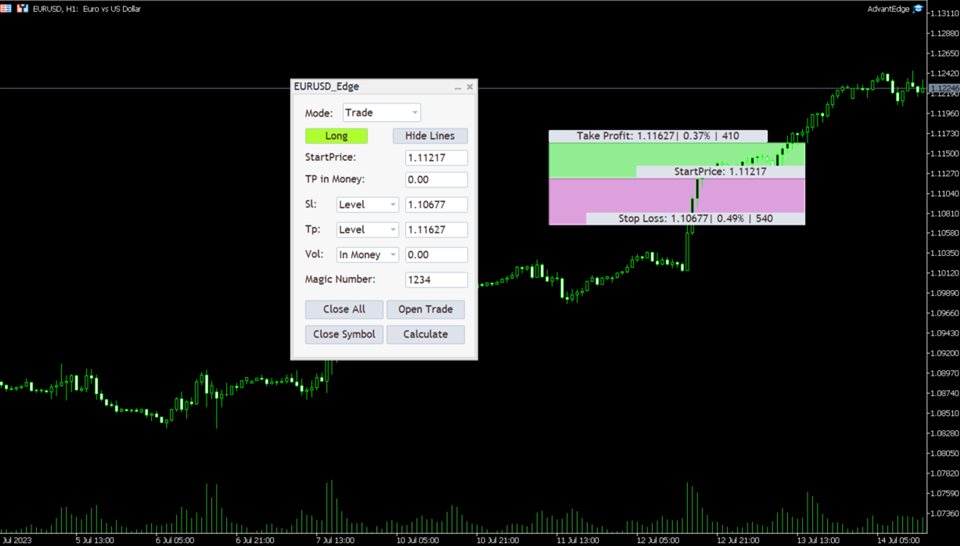
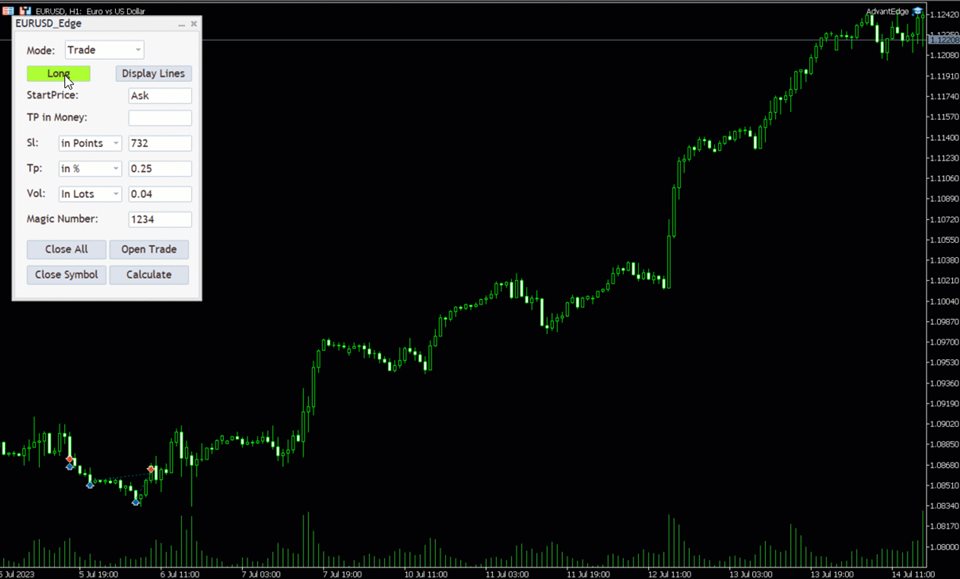
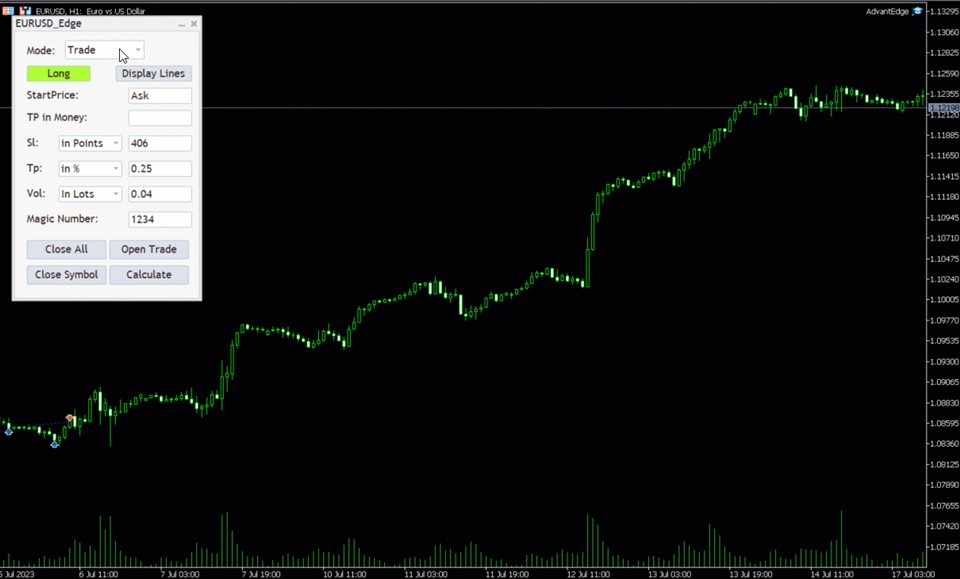
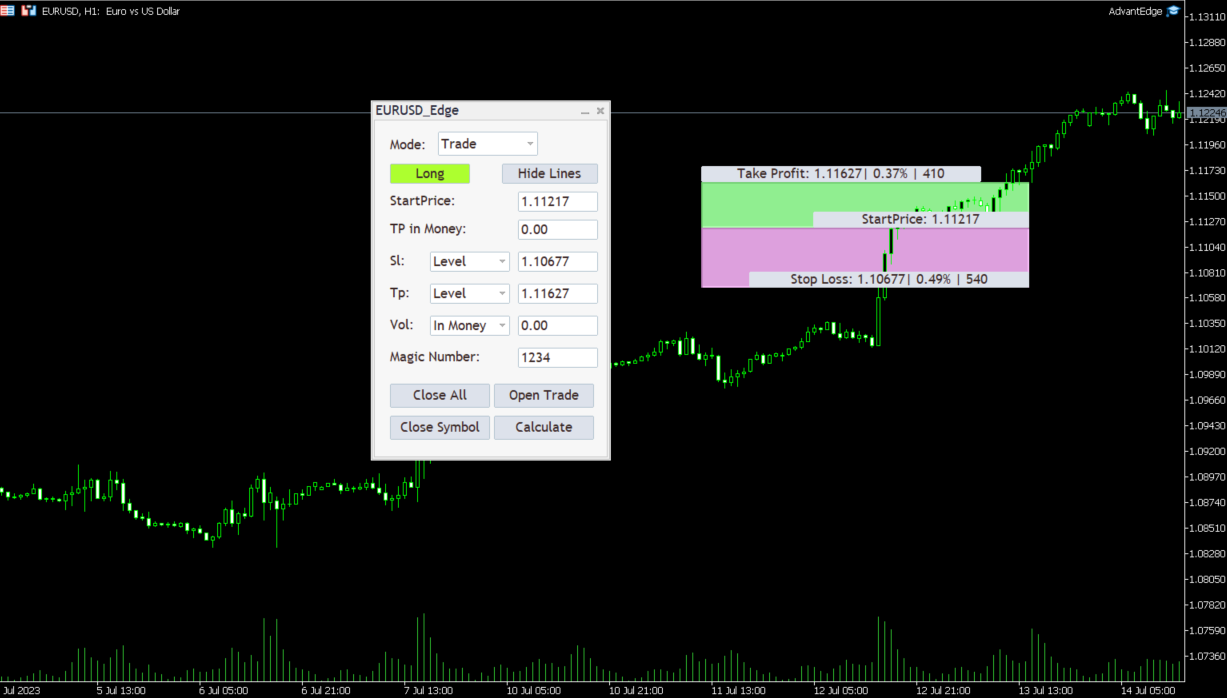
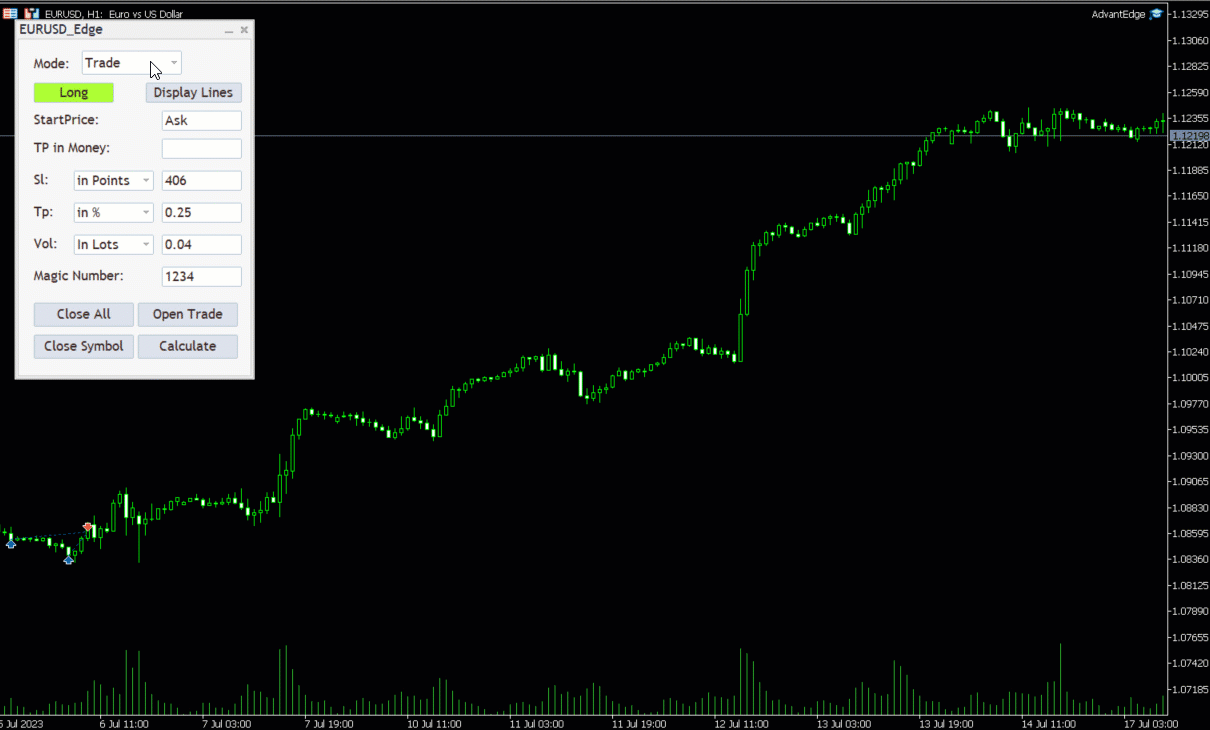
1. Trade: You have to fill out the Start price, TP (Take Profit), SL (Stop Loss), and Volume parameters and click "Open Trade," and the order/trade will be placed immediately. The "Long" button allows you to select whether you want to buy (long) or sell (short) the current security. The order will be placed as a buy stop if the start price parameter is higher than the current ask and you are long, and as a buy limit order if it is below the current ask. For short, it's the opposite. You can also set the Magic Number of the order (for distinction of EAs) with the Magic Number parameter. The stop loss and take profit parameters can be given in percentage of the start price, as a level, or in points (1/10 of a pip).
The "Display Lines" button displays the current start price, stop loss, and take profit on the chart. The displayed box shows the take profit and stop loss levels in points and percentages. These levels can be dragged, and the panel text will change automatically, making it easy to make trades based on support and resistance levels. The values in the panel always reflect the "real" values when taking a trade.
There are 4 buttons at the bottom of the panel:
- Close All: Closes all open positions and deletes all pending orders for all symbols, including positions placed by other EAs.
- Close Symbol: Closes all open positions and deletes all pending orders for the current symbol.
- Open Trade: Opens a trade or places an order with the current panel settings. The values in the text boxes will overwrite the values displayed on the chart.
- Calculate: Calculates the recovery trade based on the given take profit in monetary amount. If the take profit text box is left blank, it calculates the take profit value based on the volume and the desired monetary amount to be made. If the volume is left blank, it calculates the volume needed to achieve the goal. Please note that the actual profit may be more than the profit given by the user, as the calculated volume may be an invalid volume.
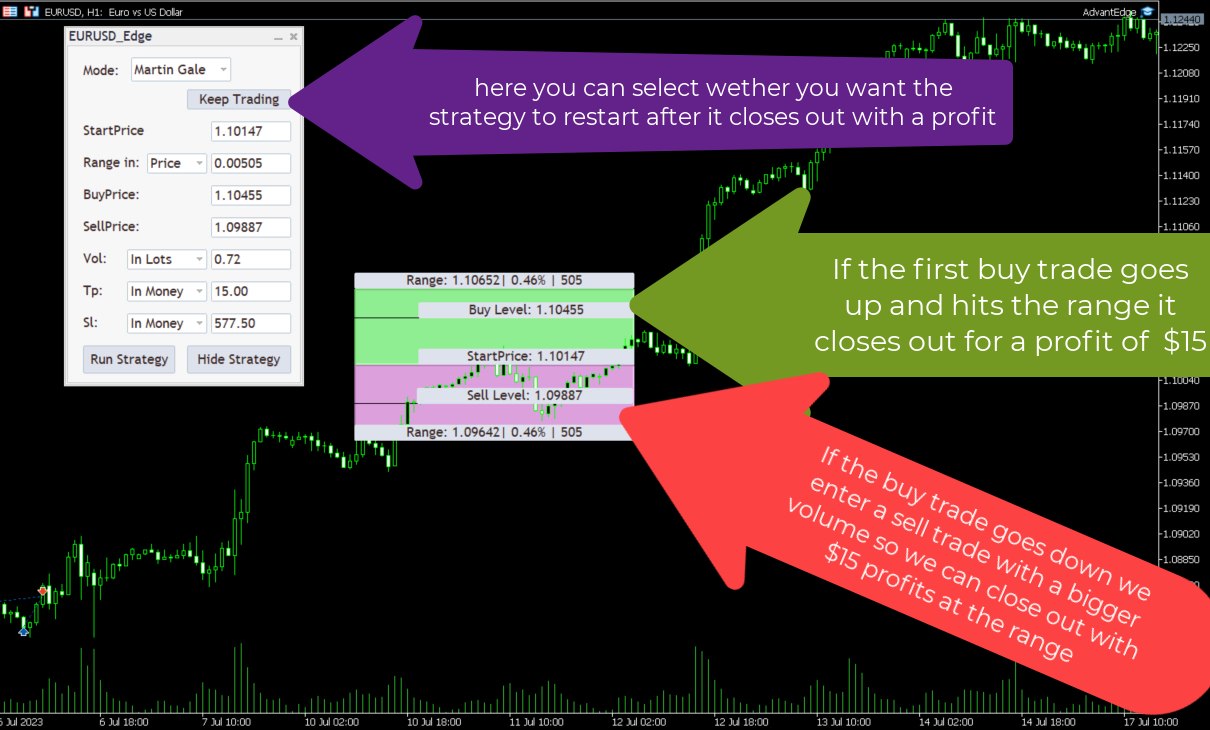
2. Zone Recovery: Zone Recovery strategies can only be executed on accounts that allow hedging. If hedging is not allowed, you will not be able to run Zone Recovery strategies. The "Stop at Close" Selection Box determines whether you want the strategy to continue trading after a profit (the strategy will stop immediately after a loss). The StartPrice parameter is the price at which the strategy will start trading when it is hit (between the ask and bid, or within 10 points of the ask or bid price). If "Keep Trading" is selected, the start price after a profit will be the ask price. If the "Status Quo" is selected the strategy will remain the same. The Range parameter is used to calculate the take profit level for buy and sell orders: StartPrice - Range is the take profit level for sell orders, and StartPrice + Range is the take profit level for buy orders. These levels are where you anticipate the price will reach after it reaches the BuyPrice or SellPrice. The Range parameter can be given in percentage points or real price. (The orders will be automatically closed upon reaching or exceeding the specified Range level, or prior to reaching that level, if the EA successfully executes a trade at the precise Buy/Sell level. In the event of a market gap or rapid price movement, the EA may execute a trade at a less optimal level, potentially resulting in a take-profit value outside the specified Range.) The BuyPrice and SellPrice should be the levels at which you anticipate a breakout in the price. The Volume parameter (Vol) is the amount of money that can be used by the strategy. After starting the strategy, this amount may decrease to the amount needed to execute the strategy, and any unnecessary amount may disappear. This parameter can be given by the user in lot size, money amount, or as a percentage of the account balance. The TakeProfit parameter (Tp) is the amount of money to be made on the current strategy. You can specify this value in money amount or as a percentage of the account balance. The StopLoss parameter (Sl) is the amount of money you are willing to lose on the current strategy. This parameter can be given in money amount or as a percentage of the account balance. If you leave this parameter blank and hit enter after filling out all the other textboxes, the EA will automatically calculate an ideal stop loss for you: at the next buy/sell level after the strategy reaches the volume and the price goes in the opposite direction of the last trade. I recommend always using this feature and adjusting the stop loss parameter according to your risk tolerance. The "Run Strategy" button is used to start or stop the strategy if it is already running. The "Display" button allows you to display the strategy on the chart (if possible). You can then drag the start level, buy and sell level, and even change the range. These changes will be displayed on the panel, and the strategy will always run based on the information in the panel. This feature allows you to improve your strategy by identifying key support and resistance levels. After running the strategy, when selecting the Zone Recovery layout of the panel, it will always display information about the currently running strategy. The only parameter that can be changed while the strategy is running is the StopLoss (modifying the takeprofit would significantly alter the strategy and its required trading volume), and you can decide whether you want your strategy to keep running after a profit. If you want to change something other than these parameters, you should stop the strategy (all orders made by the strategy will be closed) and start a new one.
2. Grid: The selection box displays "Long/Short" by default, allowing you to choose the direction for trading. If Long/Short is selected, the strategy will decide the direction based on whether the price goes up or down from the Startprice. If the price goes up, it will take only short trades, and if it goes down, it will take only long trades. The "Stop at Close" Selection Box allows you to decide whether the strategy should stop after a profit or continue with the ask price as the Startprice, or if "Status Quo" is selected, the strategy will restart and remain the same after it closes out with profits. The Startprice parameter is the level that needs to be reached before the strategy starts trading. If the selected direction is Long only or Short only, the first trade will take place at this level. If the direction is Long/Short, the first trade will take place at the next level in the grid, at a distance of Range/Density from the Startprice, after the Startprice is reached. The Range parameter can be set in price, points, or as a percentage of the Startprice. This is the interval above or below the Startprice at which the grid strategy will take trades, assuming that the price will make a retracement before continuing in the same direction. The Volume parameter determines the amount of money/lots available for the strategy. The Volume can be given in lot amount, money amount, or as a percentage of the account balance. The Takeprofit and Stoploss parameters can be set in money amount or as a percentage of the balance. If all information is filled out and the Stoploss parameter is left blank, the EA will automatically calculate an ideal Stoploss (Range/Density above or below the Range). The Orderstep parameter is the multiplier between the size of the orders. The Density parameter determines the number of trades that will take place in the Range. If you want to see a visual representation of the strategy, you can display it on the chart. You can start the strategy by clicking the "Run Strategy" button, which can also be used to stop the strategy or change the Takeprofit or Stoploss parameters later. Note that after running the strategy, the volume parameter may change, as the strategy may not use all of the volume given by the user. The parameters of the strategy displayed on the panel are the parameters set when starting the strategy. When the strategy is running and you select the Grid layout, the panel will display information about the current strategy.
For both strategies, it is important to note that you cannot edit any parameters in the strategy, except for stoploss (takeprofit for grid) and decide whether you want the strategy to keep running. When running a strategy, the volume of the strategy will be in lots. Since the lot size of a security can change, the money amount displayed on the panel may also change when shown in money amount or as a percentage of the balance. The takeprofit and stoploss are in money amount, so if the account balance changes while running the strategy, the tp and sl may also change when displayed as a percentage of the balance. The levels used in both strategies apply for Bid when selling a security and Ask when buying and the opposite when closing these orders.
My advice for using the product:
- When interpreting zone recovery or grid strategies, it is advisable to set a stoploss much higher than the takeprofit, with a recommended Sl:Tp ratio of at least 15:1.
- When changing the takeprofit or stoploss of a running strategy, it is not recommended to set a much higher takeprofit or a much lower stoploss, as it may have negative effects on the well-calculated strategies.
- I do not recommend running zone recovery and grid strategies at the same time on the same security.
- Setting the EA for the same securities multiple times with the same magic numbers may result in unexpected errors. (The EA distinguishes other EAs with the help of symbols and magic numbers).
- I do not recommend using the grid strategy with an Orderstep or Density set too high, as the starting order may be too small.
- I recommend using the EA for securities which have the account currency as either the base or margin currency.
- With price changing the size of a lot in your base currency may change, re-enter the volume if you are calculating in monetary amount.
- Don't remove Expert/close chart/close MetaTrader, when a strategy is running.
- If the Balance is 0 the Expert won't work.
I do not guarantee any profits or financial success using this EA.
The resolution of my monitor is 1920x1080. The EA should work properly on this resolution.
If you encounter any issues or have any feedback, recommendations, or questions regarding the program, please do not hesitate to contact me. I am committed to addressing any concerns and fulfilling your requirements to ensure the best possible experience with the product.
I'm constantly trying to improve this product and new versions can be expected.
I hope I could be of assistance, and that you will find this utility useful.